Are you suffering from lower back pain? Check out our top yoga for sciatica pain…
Yoga For Shoulder Pain
Shoulder, neck, and upper back pain are common in people of all ages, likely due to the fact that we use our arms for just about everything. Pulling a muscle in the upper back or neck that connects to shoulder tension can happen from carrying a bag of groceries, moving a piece of furniture, sleeping the wrong way, or pushing yourself too far at the gym.
Using yoga for shoulder pain relief is one of the easiest yet most effective ways to get your body back to feeling normal. So, what causes shoulder pain, and what kinds of yoga poses are best for getting rid of shoulder pain? Our experienced yoga class instructors at The Yoga Connection in Smithfield, NC are sharing some of our favorite yoga poses to help heal strained neck and shoulder muscles.
Why Do Yoga for Shoulder Pain?
When considering why yoga is a solution for shoulder pain, it’s important to remember that yoga can alleviate aches, pains, and discomfort all over the body as long as you know the right movements and poses to practice.
Before we get into the specific yoga poses that work best for neck and shoulder tension, it’s important to understand what might be causing your shoulder pain.
Some of the most common causes of shoulder pain are:
- Stress or anxiety that manifests through the physical tension of tight muscles in the neck, shoulder, and upper back.
- Prolonged periods of sitting and inactivity.
- Poor posture.
- A pinched nerve.
- A muscle tear or strain.
- Shoulder impingement.
- A sleeping position that aggravated the tendons or nerves of the neck or shoulder.
- Past or current injuries.
- Shoulder sprain.
- Arthritis.
- Upper back injuries.
- Neck injuries.
The shoulder is one of the most mobile joints in the body, making it prone to injury, accidents, and strain. Yoga is known to release tension, release stress, and work as a form of physical therapy for worn-out, overworked, and injured bodies.
The benefits of using yoga for shoulder pain are that yoga:
- Reduces tension and stress.
- Reduces inflammation.
- Improves balance, flexibility, and strength.
- Loosens muscles for fast and efficient pain relief.
- Promotes blood circulation and joint health.
Yoga for Shoulder Pain Poses
It’s common for people to overlook yoga poses for pain relief because they think of it as a specific type of activity that takes place in a yoga studio, outdoors, or needs to be planned for. However, it’s quite easy to take even just a few minutes a day to fit yoga poses into your busy lifestyle.
While incorporating fitness into your life by using yoga for shoulder pain is a great way to improve your mobility and overall health, it’s important to listen to the needs of your body. If at any point you feel that a particular pose or stretch is putting further strain on your shoulder, choose another movement or ask your yoga instructor for modifications.
If you are ready to grab your yoga mat and adopt a relaxing, invigorating, and revitalizing exercise program, we have some favorite yoga poses to share with you so you can get started using yoga for shoulder pain.
Downward Facing Dog Pose at the Wall
If you’ve ever been to a yoga class, you’ve seen the downward facing dog pose, as it’s one of the most often practiced and foundational moves in yoga programs. Downward facing dog at the wall is similar in technique but takes any pressure off of the wrists and shoulders that regular downward dog might aggravate.
Downward facing dog at the wall pose is great for stretching the muscles of the neck, back, triceps, biceps, and shoulders as well as the hamstrings.
- STEP 1: Begin by standing an arm’s length away at the wall, with your feet planted on the floor hip-width apart. Place the palms of your hands against the wall.
- STEP 2: Hinging your body at the hips, walk your hands down the surface of the wall, lowering them until your torso is parallel to the floor without putting strain on your body.
- STEP 3: Keeping a flat back, inhale, and ensure you are not rounding your back or shoulders forward, engaging your back and hips to pull gently away from the wall, giving your upper back and shoulders an elongated stretch, and keeping your neck lifted without dropping.
- STEP 4: Exhale, and sink into the stretch as you release that breath and hold for three to five breaths.
- STEP 5: Walk your hands back up the wall slowly, returning to a standing position for rest.
Child’s Pose
The child’s pose stretches the back, hips, ankles, and shoulders. It is a popular yoga pose for releasing tension and shoulder stiffness.
- STEP 1: Beginning on all fours on your yoga mat, position yourself with your knees widened to the outward edges of your back and your big toes coming toward one another until they touch. The palms of your hands should be planted firmly on the mat in front of you.
- STEP 2: Slowly push back with the hips, moving the glutes back toward where your toes are touching, allowing your body to fold forward, chest against the mat. You can rest your forehead on the mat or use a yoga block, pillow, or folded towel that you can rest your forehead against, depending on your level of flexibility.
- STEP 3: Breath deeply in and out, allowing yourself to relax, decompress, and hold that stretch. Your arms may remain outstretched in front of you, gently on the mat, or you can bring your arms outward and back, palms facing upward, and resting along the sides of your body.
- STEP 4: Continue to breathe in and out as long as needed to release shoulder pain and tension.
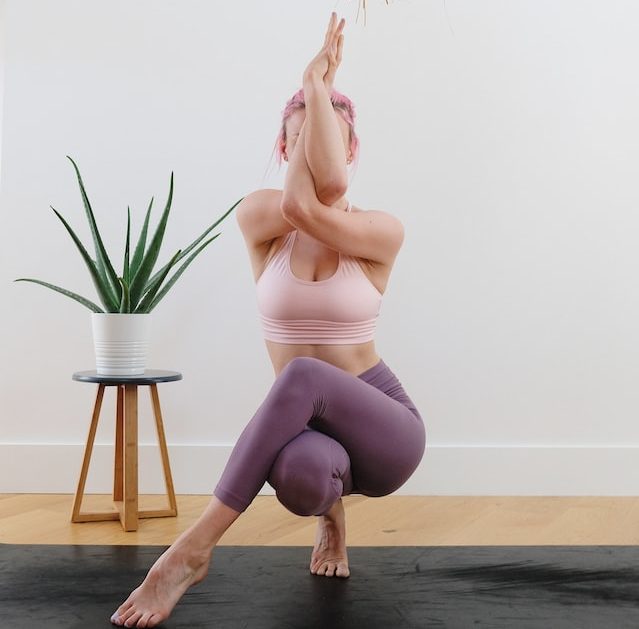
Eagle Arms Stretch
While eagle arms themselves are not overly complicated, the eagle pose they are derived from takes strength, balance, endurance, and flexibility. If you are a yoga therapy beginner or experiencing intense neck and shoulder pain, just doing the eagle arms extended stretch is sufficient. However, if you want to challenge yourself in your yoga practice and try a more advanced move, you can work on the eagle pose that activates muscles in the entire body.
- STEP 1: Depending on your goals, level of flexibility, and current state of shoulder pain, you can do the eagle stretch either standing in an eagle pose, standing with your feet together or from a seated position. Keeping your posture upright and tall, reach your arms outward in front of you with palms facing down toward the floor.
- STEP 2: Cross your arms, wrapping them around you as though giving yourself a hug, placing your right arm over your left arm.
- STEP 3: From this position, gently lift each hand toward the ceiling with fingertips pointing straight up, pressing your right elbow lightly into the crease of your left elbow, with the backs of your hands facing each other.
- STEP 4: Careful not to slip your right elbow away from the crease of the left elbow, turn your right hand and left hand both at the wrist, palms facing toward your face, inward toward one another, aligning your hands and pressing the palms against each other as much as you can, entangling your forearms into the eagle pose arm stretch.
- STEP 5: Take several slow breaths in and out as you feel the stretch between your shoulder blades, top of your shoulders, and forearms. Repeat on the other side.
Cat/Cow Stretch
The cat/cow stretch target your abdominal muscles, back, neck, and shoulders. It’s an excellent stretch to begin and end each day with, as it helps to release tension held throughout your whole body and promote circulation and flood flow.
- STEP 1: Begin on your hands and knees with your wrists aligned beneath the shoulders and the knees aligned beneath the hips. Your back should be straight like a table, engaging the ab muscles and keeping the neck upright, making sure not to hang it downward at all.
- STEP 2: Inhale, curl your toes under, and lift your pelvis backward, lightly arching the lower back, so your tailbone sticks upward. Slowly elongate the stretch up the lower back, mid-back, upper back, and then neck as you move and hold the cow pose.
- STEP 3: As you exhale, slowly uncurl your toes, tuck your tailbone inward, and draw your abdominals inward toward your belly button as you gently curl your back into the cat pose, dropping the neck so you are facing the naval.
- STEP 4: Continue back and forth from inhaling into cow pose to exhaling into cat pose as needed.
Thread the Needle Pose
Used to open the shoulders and stretch the whole spine, the thread-the-needle pose is one of the best yoga poses for shoulder pain.
- STEP 1: Start on all fours with hands under your shoulders and knees under your hips. Open your chest, turning toward the right with your right arm extended toward the ceiling. Look up toward the raised hand.
- STEP 2: Bring your right arm into the movement toward the mat, under your chest, and through toward the left side of your body, naturally facing downward toward the mat as your arm moves.
- STEP 3: Begin slowly sliding the right arm further to the left, lowering the right shoulder until it reaches to rest against the mat.
- STEP 4: Extend your left arm overhead, fingers pointing toward the top of your yoga mat, resting the right side of your forehead against the mat. Continue to breathe in and out, stretching your right fingertips toward the left until you feel the stretch across the right obliques, shoulder, and back.
- STEP 5: Hold the stretch, then repeat on the other side.
Practice Yoga for Shoulder Pain Relief in Smithfield
Are you looking to begin practicing yoga poses for your shoulder pain, another physical injury, or muscle tension? Or, do you need to find an exercise routine that heals your mind and body from the inside out?
The Yoga Connection helps our members learn yoga poses that help to reduce neck pain, shoulder pain, back pain, and other ailments as well as reduce stress and anxiety. Our focus on physical and mental health as well as self-care through yoga practice is available through yoga classes for all levels of yogis.
Contact us today at 919-971-1431 to sign up for a Smithfield yoga class or fill out the form below to get started!